How to - MiModD recipes
Overview of recipes
Alignment recipes
Annotation recipes
Compatibility recipes
Re-align coordinate-sorted (previously aligned) reads
coming soon ...
Prepare and use a custom hyperlink template file
coming soon ...
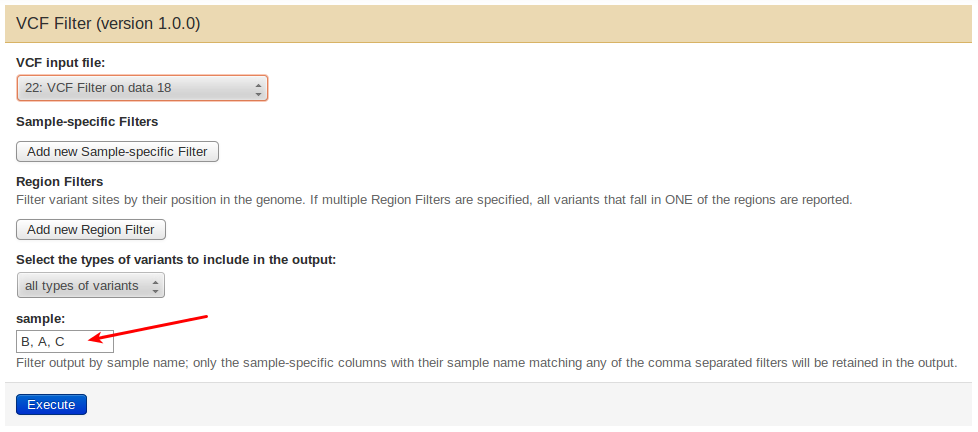
Change the order of the samples in a multi-sample vcf file
Vcf files in MiModD are typically multi-sample files that store information about variant sites on a per-sample basis. The CloudMap series of tools, however, does not operate on multiple samples in parallel. Instead, CloudMap will always work with the first sample in a vcf file and ignore the rest. The sample-specific information in a vcf file is organized in columns and the order of samples is determined by the order of the corresponding columns, i.e., CloudMap tools will always work with the sample encoded in the first sample-specific column (the 10th column), so if you want CloudMap to analyze the data of a different sample, you will have to change the sample order.
This can be done using the vcf_filter command line tool or the VCF
Filter tool from Galaxy. In Galaxy, open the tool’s interface and
provide the (comma-separated) names of all samples in their new desired
order, i.e., for a vcf file describing three samples A, B, C, to analyze
sample B with any CloudMap tool, you should specify either B,A,C or
B,C,A to make B the first sample in the output.
From the command line, use the –v_filter option to specify the new sample order, e.g.:
mimodd vcf_filter <vcf input file> -o <filtered output file> --v_filter B C A
The result is a new vcf file ready to be used with CloudMap.
Generate a species configuration file for CloudMap
coming soon ...
Import large files into Galaxy
The simple way of uploading data with the Upload Data tool from the Get Data section of Galaxy is inefficient for local installations and large files not only because it unneccessarily invokes web protocols for local file operations, but also because it stores a copy of a file in Galaxy’s internal database everytime that file gets uploaded to any user’s current history.
A preferable, albeit more complicated procedure for making local files accessible from Galaxy is through the use of Shared Data Libraries, which typically involves copying every file only once (at the time when it is added to the library).
Here is a brief description how to do it (a much longer and in-depth guide can be found at https://wiki.galaxyproject.org/Admin/DataLibraries/Libraries :
Step 1: Create a Data Library to share between users
(Note that even if you are the only user of your system you will have to do this.):
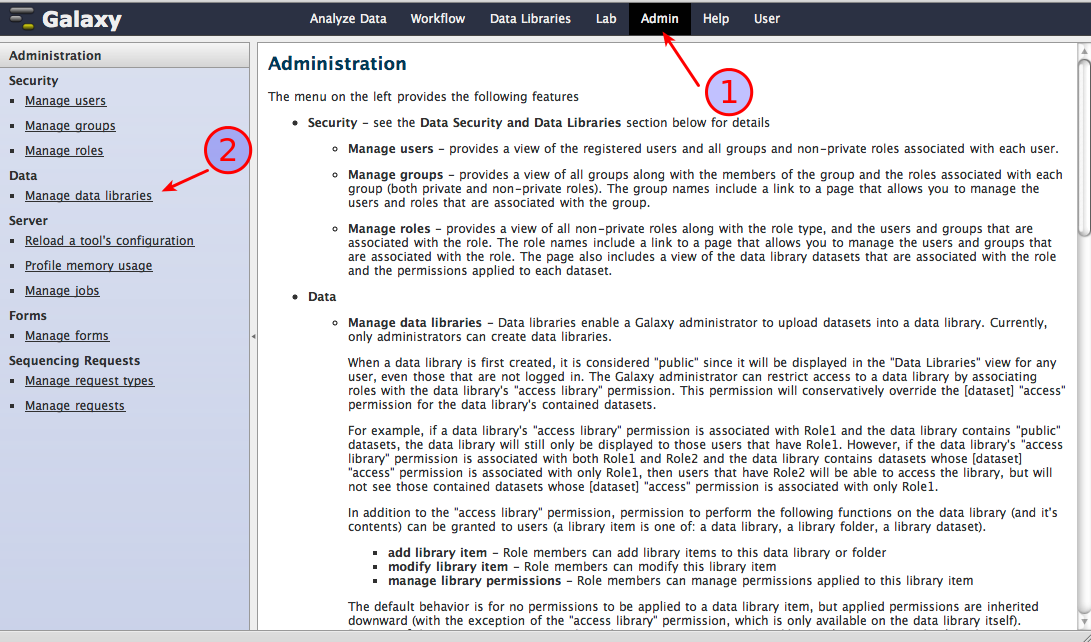
make sure you are logged in as a user with administrator rights
select Admin (1), then click on Manage data libraries (2) as shown in the screenshot below
in the library browser that opens, select Create new data library
give a name to the new library and enter additional information as you see fit, then create the library
Next, you can specify permissions for working with the new library. How exactly you do this depends very much on your needs, e.g., the numbers of users of your system and if they are allowed to use each other’s data. We will assume here that you want to set up a library that is managed by a single user, i.e., only he can add and remove datasets to/from the library, but that can be used by everyone, i.e., any user can import datasets from the library to their personal histories.
again from the library browser, choose Library Actions -> Edit permissions
associate the user responsible for the library with the rights to
- modify the library,
- add to it, and
- manage the library permissions
as shown in the next screenshot.
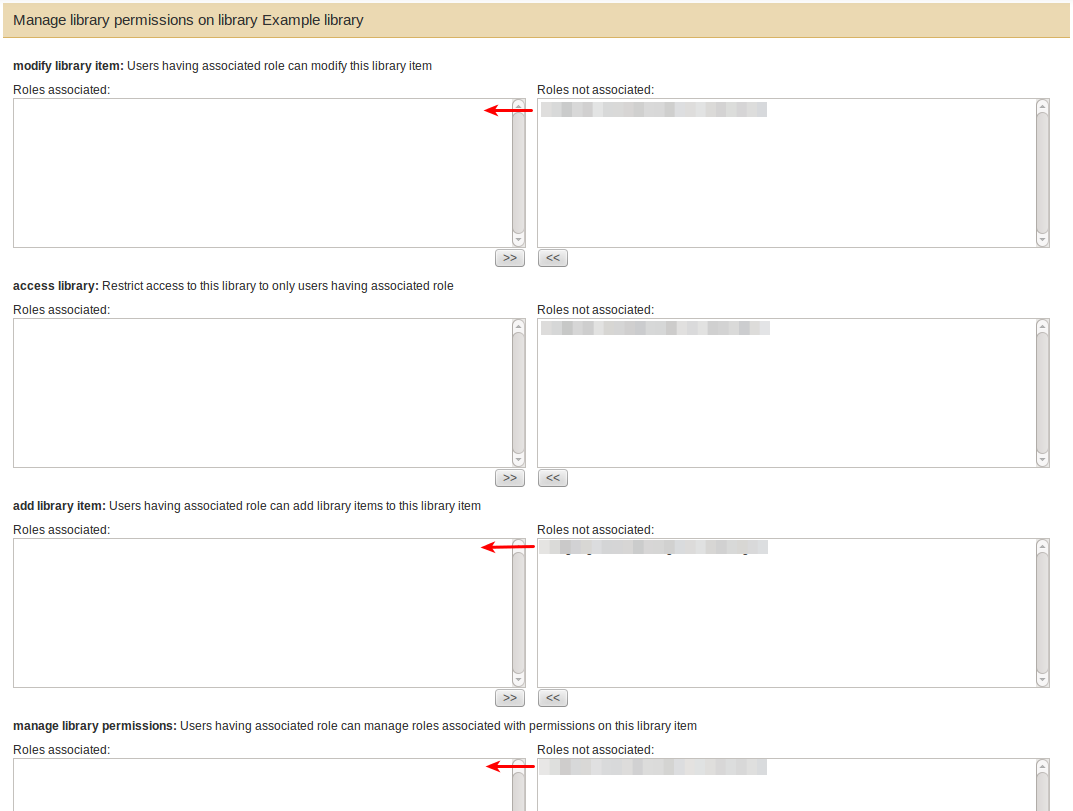
Note
By default, a newly created library will be accessible by everyone, which is what we want here. Only when you associate the first user specifically with access rights will it become inaccessible to other users without explicit rights.
Step 2: Adding datasets by uploading data from a directory of files
The library is ready now to add datasets to it. There are several ways how you can do this (see https://wiki.galaxyproject.org/Admin/DataLibraries/UploadingLibraryFiles for a comprehensive discussion), but we will describe here only one of them, namely the approach of uploading data from a directory of files as an administrator, which we think is best suited for importing large WGS data files.
This approach requires a modification to Galaxy’s central configuration file, universe_wsgi.ini :
open the file, which you can find in the root folder of your Galaxy installation, in a text editor
locate the
library_import_dirsetting section, which in an unmodified file should look like this:# Add an option to the library upload form which allows administrators to # upload a directory of files. #library_import_dir = None
modify the second line to read:
library_import_dir = /some_local_directory_of_files
where
/some_local_directory_of_filesshould specify a server directory in your file system, from which Galaxy Administrators will be allowed to upload data.Note
If the server directory contains subdirectories, you will later, in the Upload dialogue, be offered the choice which of them you want to upload files from, otherwise the files found in the server directory itself will be uploaded by default. Nested subdirectories, however, are not supported, i.e., you can only upload files from directories that are one level below the server directory.
After saving this change, restart the Galaxy server, log back in with an Administrator account and go to Admin -> Manage data libraries again.
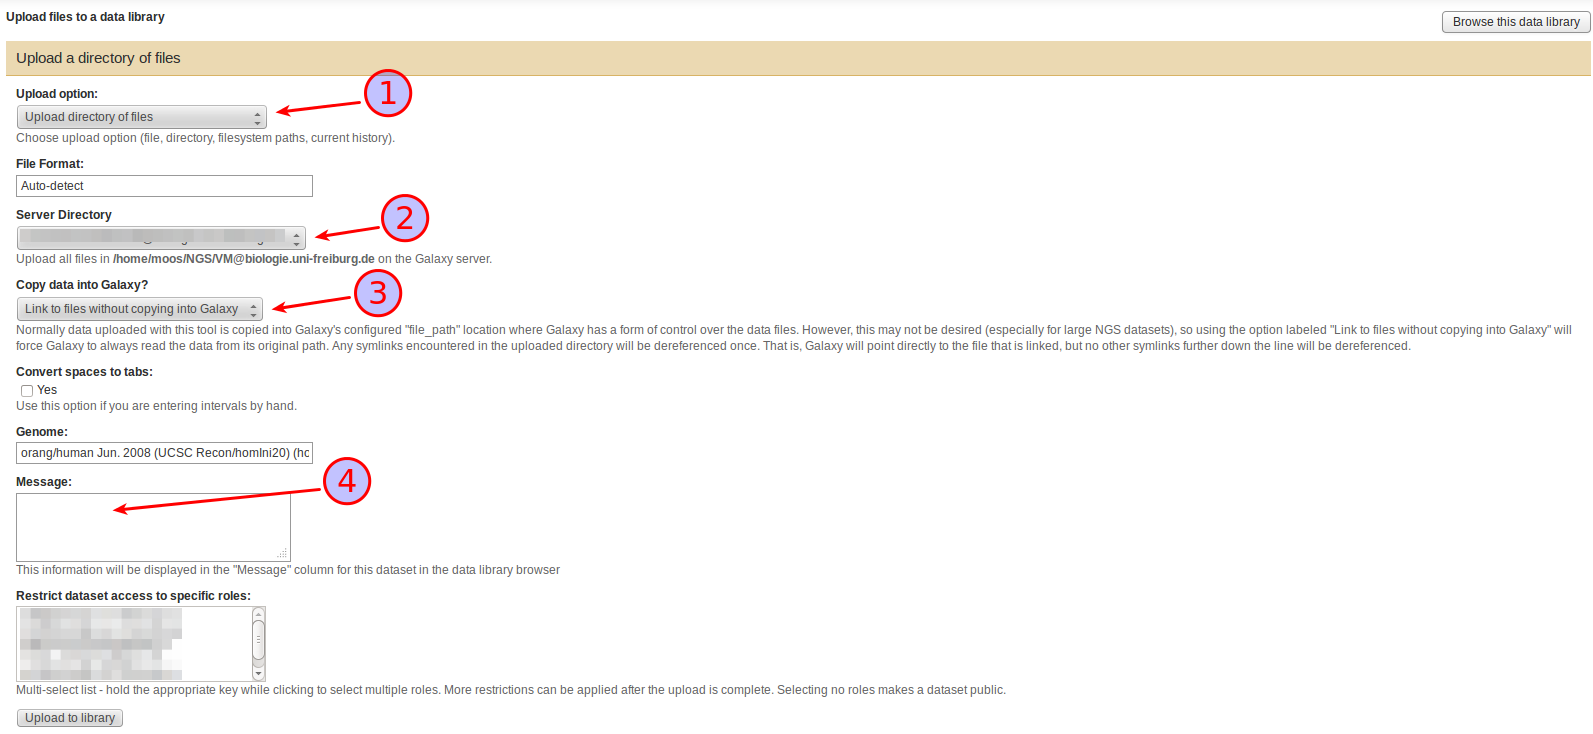
In the library browser select your library from Step 1, then Add datasets to start uploading data.
In the Upload files dialogue that appears select
Upload directory of files as Upload option (1),
a subdirectory of the Server Directory (if it contains any) to upload files from (2),
under Copy data into Galaxy, whether you want to copy the files found in the Server directory into Galaxy or whether you want to just link to them (3),
Also take the time to compose a helpful Message (4). This text will be displayed as a description of the dataset in the library and can be extremely helpful for finding a specific dataset in a growing library. If you are mixing linked and copied files in your library, this is also the place to state the nature of the current set since that information is not currently displayed anywhere else in the library.
Press Upload to library to start the upload.
Step 3: Importing library items to a history
Once the upload is finished, every user with access rights (i.e., all users in this case) will be able to import the file into their current history without copying it again:
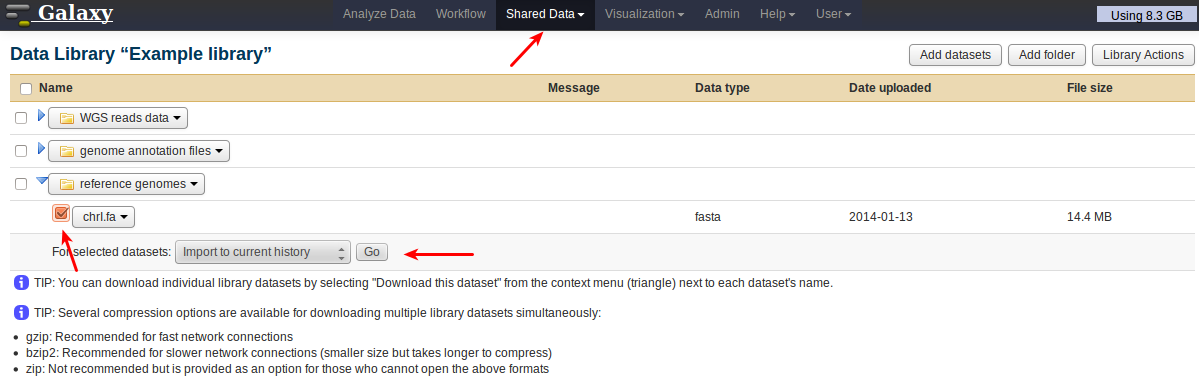
Locate the dataset by going to Shared Data, then selecting library and folder. Select the dataset by ticking its checkbox, choose the action to perform, and press Go.
Working with a linked library
It is always convenient to have a shared data library organized in folders, e.g. you may want separate folders for sequenced reads files, reference genomes and genome annotation files and you may want to use folders to group your sequenced reads files by experiment. Folders may also have more restricted permission settings than the library, so you could have some publicly accessible folders, while others may be accessible only to certain users.
Folders in a data library can be created conveniently by selecting Add folder in the Data library view. Subfolders can be created from the dropdown menu associated with every existing folder. The same menu allows the upload of data to specific folders, but datasets can also be move around between folders by selecting Move this dataset from their own dropdown menu.
In the case of a linked library, i.e. a library, in which at least some datasets got imported by linking to files without copying them into Galaxy (see above), it can, in addition, be very advantageous if the data library folder structure reflects that of the underlying server directory, so that it is easy to fix broken links.
As stated above though, uploading from nested subdirectories is not supported by Galaxy, so how can you even import data from a well-organized directory structure ?
One extremely helpful feature of Galaxy here is that during the upload step it will follow symbolic links and, in the case of linking to files instead of copying them, will store in the library the location of the target file (not that of the symbolic link).
This behavior enables the upload of files from any level of nesting simply by placing symbolic links to these files in a special first-level upload directory, which you declare as the server directory in the universe_wsgi.ini configuration file. After data has been imported, it is safe to remove the symbolic links from the upload directory.
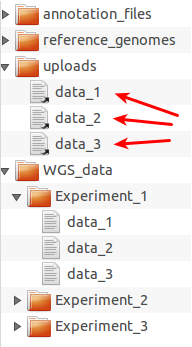
Example directory structure for organizing files for upload to Galaxy.
WGS_data folder and grouped into
experiment-specific subdirectories. The server directory, in this
example, should be set to the uploads folder in universe_wsgi.ini
(library_import_dir = some_path/uploads). Then any selection of data
files can be uploaded to Galaxy by putting symbolic links (arrows) to
these files into the uploads folder as shown here for the files from
Experiment_1. After the import, the symbolic links can be deleted to
prepare uploads for a new data import cycle.One advantage of sticking to a standardized folder structure in the data library and on disk is that it allows the administrator to rotate files easily:
assuming all files are backed up on some external storage device (as they always should be !), old files that are rarely used anymore can be removed from the file system to free disk space, but will remain visible as datasets in the data library (and possibly in old histories of users who imported them at some point). If later any user actually needs access to the file again, the administrator can restore access simply by copying the file from the backup device into the file system location corresponding to the location of the dataset in the library.
Use gzipped fastq files in Galaxy
By default, gzip compressed files are imported into Galaxy as decompressed copies. So even though MiModD can deal with gzipped fastq input, exploiting this feature from within Galaxy requires a workaround.
Currently, the only way to prevent gzip decompression during data import into Galaxy is to link to the compressed files instead of copying them into Galaxy. Step-by-step instructions on how to obtain linked datasets can be found in the Import large files into Galaxy section.
However, while the use of linked datasets prevents Galaxy from decompressing the data, it will still frown upon the data and strip off the .gz file name extension from the resulting dataset name. Galaxy will set the format of a linked gzipped fastq dataset to data instead of fastq, but to avoid later confusion due to the dataset name it is a good idea to add the .gz extension back by selecting Edit Information from the dropdown menu associated with the dataset name right after the import.
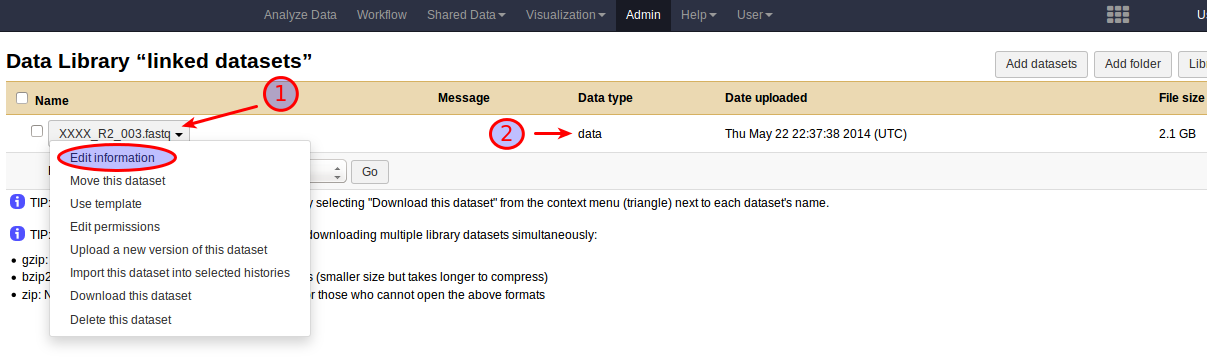
The result of adding a .fastq.gz file to Galaxy as a linked dataset.