How to - MiModD recipes
Overview of recipes
Resolving $PATH issues
Alignment recipes
Annotation recipes
Performance tips
Compatibility recipes
Galaxy recipes
Add the mimodd executable to $PATH
If you get a command not found or similar error message with the mimodd
command, you need to make sure that your system can discover a copy of the
executable file from the $PATH environment variable.
For this, you need to locate the executable file and add the containing folder to the $PATH variable. Try to:
Find the folder that MiModD has been installed in by executing:
python3 -m MiModD.config
and record the path reported in the top part of the output.
Truncate this (possibly long) path from the end up to the right-most occurence of
lib/and replace thelib/withbin/.The result is the <executable_folder> you are looking for.
Finally, you can either
append the folder to your $PATH variable.
For just the currently opened command line session you can use:
PATH=$PATH:<executable_folder>
export $PATH
The best way to make the change to $PATH permanent is OS- and shell-dependent. Some guidelines can be found here.
or, alternatively,
copy the executable file from its current folder to a location already in $PATH.
Use:
echo $PATH
to learn which folders are already added to $PATH, then do:
cp <executable_folder>/mimodd <folder_on_$PATH>
Note
In a multi-user environment, copying the executable to a folder that is also defined in the $PATH of other users may lead to confusion, so approach a) should, generally, be preferred to b).
Example:
% python3 -m MiModD.config

Settings for package MiModD in: /home/xy/.local/lib/python3.4/site-packages/MiModD
The path to the executable is /home/xy/.local/bin/.
Now either add this folder to $PATH:
PATH=$PATH:/home/xy/.local/bin/
export $PATH
or copy the executable. For example:
% echo $PATH

/usr/local/sbin:/usr/local/bin:/usr/sbin:/usr/bin:/sbin:/bin

% cp /home/xy/.local/bin/mimodd /usr/local/bin
where the last command would likely require a prepended sudo.
Prepare and use a custom hyperlink template file
The annotate tool can produce formatted html output, in which variant positions are formatted as hyperlinks to model organism genome browser views and genes affected by these variants as hyperlinks to their reference database entries. To do so, the annotate tool needs hyperlink templates that instruct it how to form position- and gene-specific links. MiModD comes with a built-in lookup table of species and corresponding hyperlink templates for a number of model organisms, but what can you do if:
- your favorite organism is not in the table?
- you would prefer different hyperlinks for a supported organism (e.g., you would like to link to a custom database?
- you find that the default hyperlink for a supported species is broken?
The very first thing you should do in such a case is: let us know!!
While we do not have the time to add templates for all possible model organisms or to keep monitoring all existing templates for broken functionality, we are always prepared to help our users.
The second option you have - if you do not want to wait until we provide a fix or if you just want to experiment with your own custom links - is to generate a custom hyperlink template file.
Such a file can be passed to the annotate tool through its -l, --link
option and will be used instead of the built-in templates if provided.
The file must be structured like this:
species : <name of your organism>
pos     : <genome position link template>
gene    : <affected gene link template>

[optional additional records]
, where either a single pos or a single gene line or both must be provided after a species line. Whitespace is not significant in the file.
You can freely choose the <name of your organism>. However, the exact name
of one of the species provided by the file has to be passed to annotate
through the --species option when that file is used.
The <genome position link template> and <affected gene link template>
must be valid urls except that they can make use of replacement fields to be
substituted with variant-specific values.
These are the currently recognized replacement fields for the <affected gene
link template>:
| replacement field | substituted with |
|---|---|
| {gene} | affected gene as reported by annotate |
| {transcript} | affected transcript as reported by annotate |
| {transcript.basename} | affected transcript with name truncated at
first . |
and these are the replacement fields for the
<genome position link template>:
| replacement field | substituted with |
|---|---|
| {chromosome.name} | chromosome name as reported by annotate |
| {chromosome.shortname} | chromosome name with standard prefixes replaced
by chr |
| {chromosome.barename} | chromosome name with standard prefixes stripped |
| {start} | nucleotide position as reported by annotate - 500 nts |
| {stop} | nucleotide position as reported by annotate + 500 nts |
To illustrate how these elements can be useful to construct hyperlink templates, here is how the default hyperlink templates would be written as a custom hyperlink template file:
species : C. elegans
gene    : http://www.wormbase.org/species/c_elegans/gene/{gene}
pos     : http://www.wormbase.org/tools/genome/gbrowse/c_elegans_PRJNA13758?name={chromosome.barename}:{start}..{stop}

species : S. cerevisiae
gene    : http://www.yeastgenome.org/cgi-bin/locus.fpl?locus={gene}
pos     : http://browse.yeastgenome.org/fgb2/gbrowse/scgenome/?name={chromosome.barename}:{start}..{stop}

species : Synechocystis
gene    : http://genome.microbedb.jp/cyanobase/Synechocystis/genes/search?q={gene}&keyword=search&m=gene_symbol%2Cgi_gname%2Cdefinition%2Cgi_pname
pos     : http://genome.microbedb.jp/cgi-bin/gbrowse/Synechocystis/?name={chromosome.barename}:{start}..{stop}

species : D. melanogaster
gene    : http://flybase.org/reports/{transcript}.html
pos     : http://flybase.org/cgi-bin/gbrowse2/dmel/?name={chromosome.barename}:{start}..{stop}'

species : D. rerio
gene    : http://www.ensembl.org/Danio_rerio/Gene/Matches?db=core;t={transcript}
pos     : http://zfin.org/gb2/gbrowse/zfin_ensembl/?name={chromosome.barename}:{start}..{stop}

species : A. thaliana
gene    : http://www.arabidopsis.org/servlets/TairObject?name={transcript.basename}&type=locus
pos     : http://tairvm17.tacc.utexas.edu/cgi-bin/gb2/gbrowse/arabidopsis/?name={chromosome.shortname}:{start}..{stop}
Assuming that file is saved as custom_links.txt, you could use it, for
example, like this:
mimodd annotate example2_q3_variants.vcf --species "S. cerevisiae" --link custom_links.txt -o example2_q3_anno.html -f html
to generate the annotated output from the second tutorial section without relying on the built-in templates.
See also
the annotate tool documentation.
Understand and use multiprocessing efficiently
Parallel processing built into MiModD
Several MiModD tools use parallel data processing transparently to speed up the respective analysis step. By default, these tools, including the computationally intensive core tools snap, snap-batch, snap-index and varcall, will use as many parallel processes as indicated by the MULTITHREADING_LEVEL setting in the MiModD configuration file.
Note
Make sure you use the config tool to set the MULTITHREADING_LEVEL parameter to a value suitable for your machine.
Alternatively, all tools that use internal parallel processing, from the
command line, can be instructed to use a certain number of parallel processes,
usually, by providing the number with the -t or --threads command
line option. This runtime setting overrides the setting in the MiModD
configuration file.
For example, to perform the variant calling from the third tutorial example using 6 parallel processes independent of the general configuration settings, you would run:
mimodd varcall WS220.64.fa example3.aln.bam -o example3_calls.bcf -t 6 --quiet --verbose
This method can be used to make one specific analysis step use more or less processor power depending on other tasks currently running on the machine.
There is no equivalent to the -t option from the Galaxy interface and this
is intentional to prevent remote users accessing the server from overcommitting
processors on the machine.
What is the optimal setting for parallel processing?
The optimal degree of parallel processing depends on several factors, but most importantly on the number of logical processors available on your system, which should dictate its maximum setting: splitting up calculation-intensive work as performed by most MiModD tools into more processes than there are processors to take care of them, will generally result in reduced, rather than improved performance.
In practice, you will usually want to keep always at least one processor unoccupied by MiModD to ensure responsiveness of other system tasks during an ongoing analysis. If you run MiModD from within Galaxy, be aware that one additional process will be occupied with running Galaxy itself. If you are planning to run additional processor-hungry software in parallel to analyses with MiModD, you will probably want to set aside additional processor power for these applications.
An additional factor to consider is the number of chromosomes of your favorite organism. If you are going to analyse mostly data from this organism, it can be advantageous to choose the degree of multiprocessing such that the chromosome number is a multiple of it since, in the current version, variant calling in MiModD is split into processes on a per-chromosome basis.
As a starting point, we recommend setting MULTITHREADING_LEVEL to ~ 2/3 of
the number of available processors rounded to the nearest multiple of your
organism’s chromosome number. When using MiModD from the command line, you
can then use the -t tool option to allocate more or less processor power
in situations with an exceptionally low or high number of additional tasks
running on the system.
See also
- Configuring MiModD for your system
- the config tool
Parallel execution of several MiModD tools
Currently, MiModD does not provide built-in support for parallel processing downstream of variant calling. However, the analysis workflow of the package was designed to allow for simple parallel job execution by users.
Specifically, the varextract, covstats and delcall tools do not need to be run sequentially, but require as input only files generated by upstream tools. After variant calling is performed on a particular dataset, it is, thus, possible to extract the called variants, calculate coverage statistics and call deletions in parallel using three independent processes. From Galaxy, parallel job execution is as simple as executing additional jobs while others are still running. From the command line, you can use standard shell job control syntax, i.e., use bg or append an &, to execute any command as a background job and keep the command prompt available for executing additional commands.
As an example, you could run:
$ mimodd varextract example1_calls.bcf -o example1_extracted_variants.vcf &
$ mimodd delcall SRR101486.aln.bam example1_calls.bcf -o example1_deletions.txt --max-cov 4 --min-size 100
to perform, in parallel, analysis steps 3 and 5 from the first tutorial section.
Change the order of the samples in a multi-sample vcf file
vcf files in MiModD are typically multi-sample files that store information about variant sites on a per-sample basis.
Although these files conform to the official file format specification, some third party tools may not operate correctly on them. Some tools may refuse to work with multi-sample input files, while others may appear to work, but will really just detect and work on the first sample in the file.
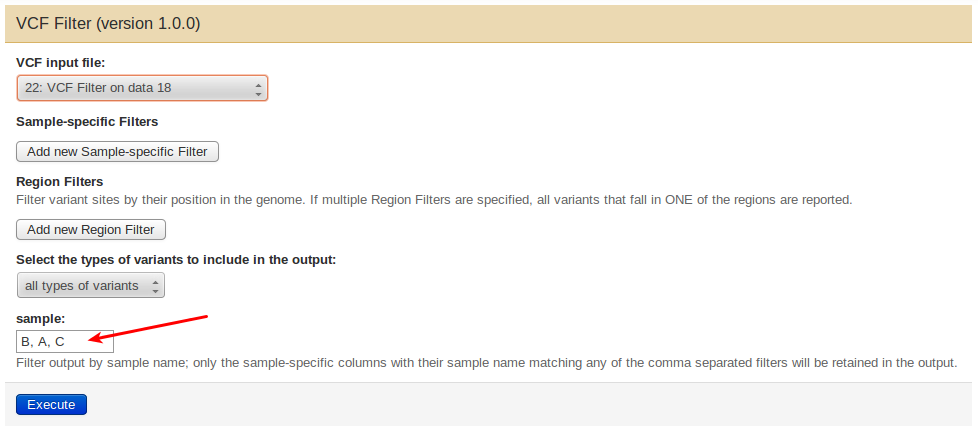
For both cases, MiModD offers the possibility to generate compatible output through the vcf-filter command line tool or the VCF Filter tool from Galaxy. The sample-specific information in a vcf file is organized in columns with the first sample described in the left-most column and the tool will allow you to keep just certain columns and to change the order of the retained columns.
To do this from Galaxy, open the tool’s interface and provide the (comma-separated) names of all samples you would like to keep in the output in their new desired order in the sample field, i.e., for a vcf file describing three samples A, B, C, you may write B,C,A to obtain a new file with the sample order rotated counter-clockwise.
From the command line, use the –vfilter option to specify the new sample order, e.g.:
mimodd vcf-filter <vcf input file> -o <filtered output file> --vfilter B C A
The result is a new vcf file ready to be used to analyse sample B with tools only capable of detecting the first sample of the file, while retaining all sample information for use by MiModD and other suitable software.
Likewise, for tools rejecting any multi-sample vcf file, you can omit all, but one sample from the output. From the command line, to keep just sample B from the above example you can run:
mimodd vcf-filter <vcf input file> -o <filtered output file> --vfilter B
Import large files into Galaxy
The simple way of uploading data with the Upload Data tool from the Get Data section of Galaxy is inefficient for local installations and large files not only because it unneccessarily invokes web protocols for local file operations, but also because it stores a copy of a file in Galaxy’s internal database everytime that file gets uploaded to any user’s current history.
A preferable, albeit more complicated procedure for making local files accessible from Galaxy is through the use of Shared Data Libraries, which typically involves copying every file only once (at the time when it is added to the library).
Here is a brief description how to do it (a much longer and in-depth guide can be found at https://galaxyproject.org/data-libraries/):
Step 1: Create a Data Library to share between users
(Note that even if you are the only user of your system you will have to do this.):
make sure you are logged in as a user with administrator rights
select Admin (1), then click on Manage data libraries (2) as shown in the screenshot below
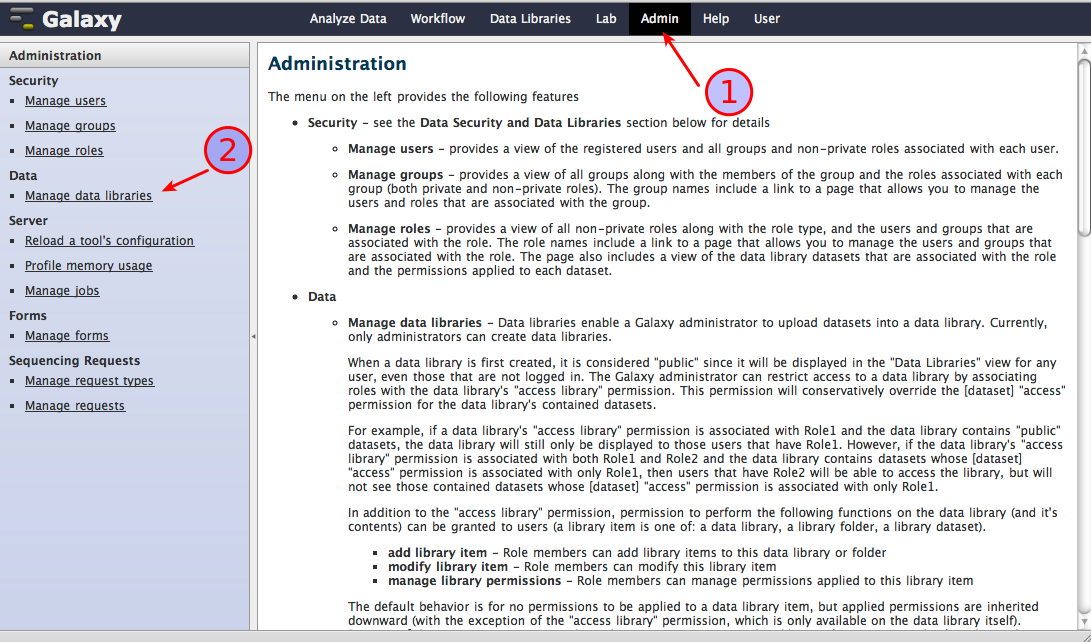
in the library browser that opens, select Create new data library
give a name to the new library and enter additional information as you see fit, then create the library
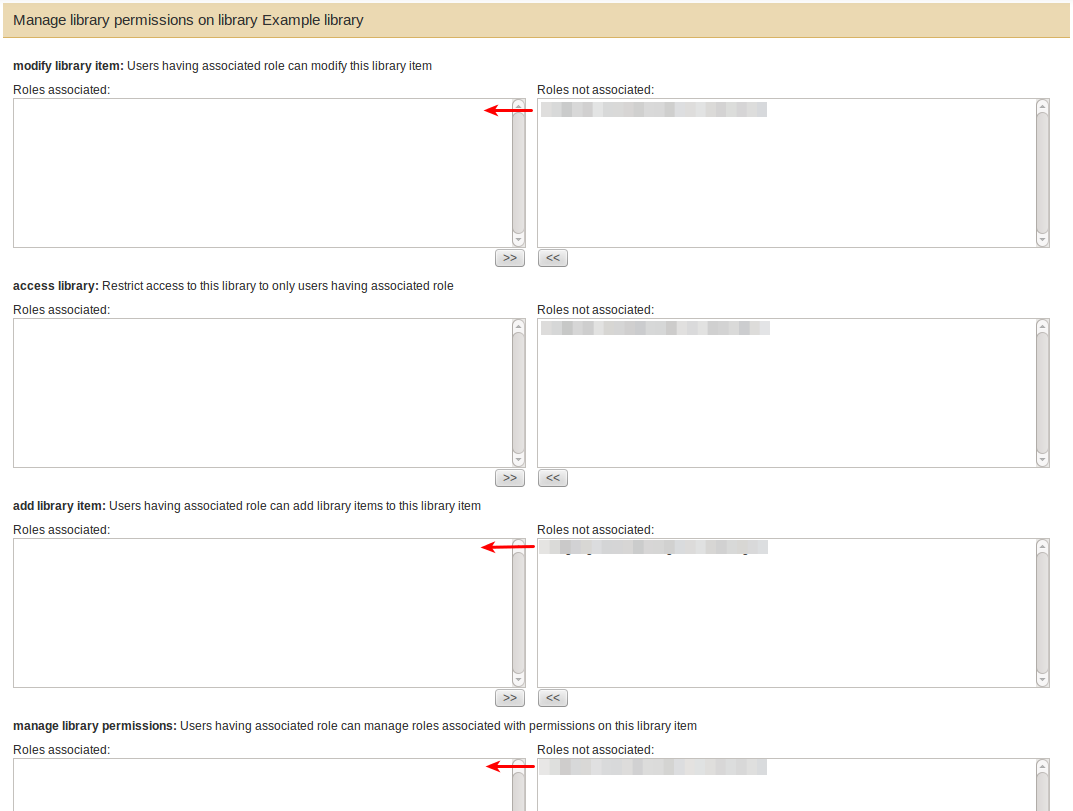
Next, you can specify permissions for working with the new library. How exactly you do this depends very much on your needs, e.g., the numbers of users of your system and if they are allowed to use each other’s data. We will assume here that you want to set up a library that is managed by a single user, i.e., only he can add and remove datasets to/from the library, but that can be used by everyone, i.e., any user can import datasets from the library to their personal histories.
again from the library browser, choose Library Actions -> Edit permissions
associate the user responsible for the library with the rights to
- modify the library,
- add to it, and
- manage the library permissions
as shown in the next screenshot.
Note
By default, a newly created library will be accessible by everyone, which is what we want here. Only when you associate the first user specifically with access rights will it become inaccessible to other users without explicit rights.
Step 2: Adding datasets by uploading data from a directory of files
The library is ready now to add datasets to it. There are several ways how you can do this (see https://galaxyproject.org/data-libraries/#importing-datasets for a comprehensive discussion), but we will describe here only one of them, namely the approach of uploading data from a directory of files as an administrator, which we think is best suited for importing large WGS data files.
This approach requires a modification to Galaxy’s central configuration file, universe_wsgi.ini :
open the file, which you can find in the root folder of your Galaxy installation, in a text editor
locate the
library_import_dirsetting section, which in an unmodified file should look like this:# Add an option to the library upload form which allows administrators to # upload a directory of files. #library_import_dir = None
modify the second line to read:
library_import_dir = /some_local_directory_of_files
where
/some_local_directory_of_filesshould specify a server directory in your file system, from which Galaxy Administrators will be allowed to upload data.Note
If the server directory contains subdirectories, you will later, in the Upload dialogue, be offered the choice which of them you want to upload files from, otherwise the files found in the server directory itself will be uploaded by default. Nested subdirectories, however, are not supported, i.e., you can only upload files from directories that are one level below the server directory.
After saving this change, restart the Galaxy server, log back in with an Administrator account and go to Admin -> Manage data libraries again.
In the library browser select your library from Step 1, then Add datasets to start uploading data.
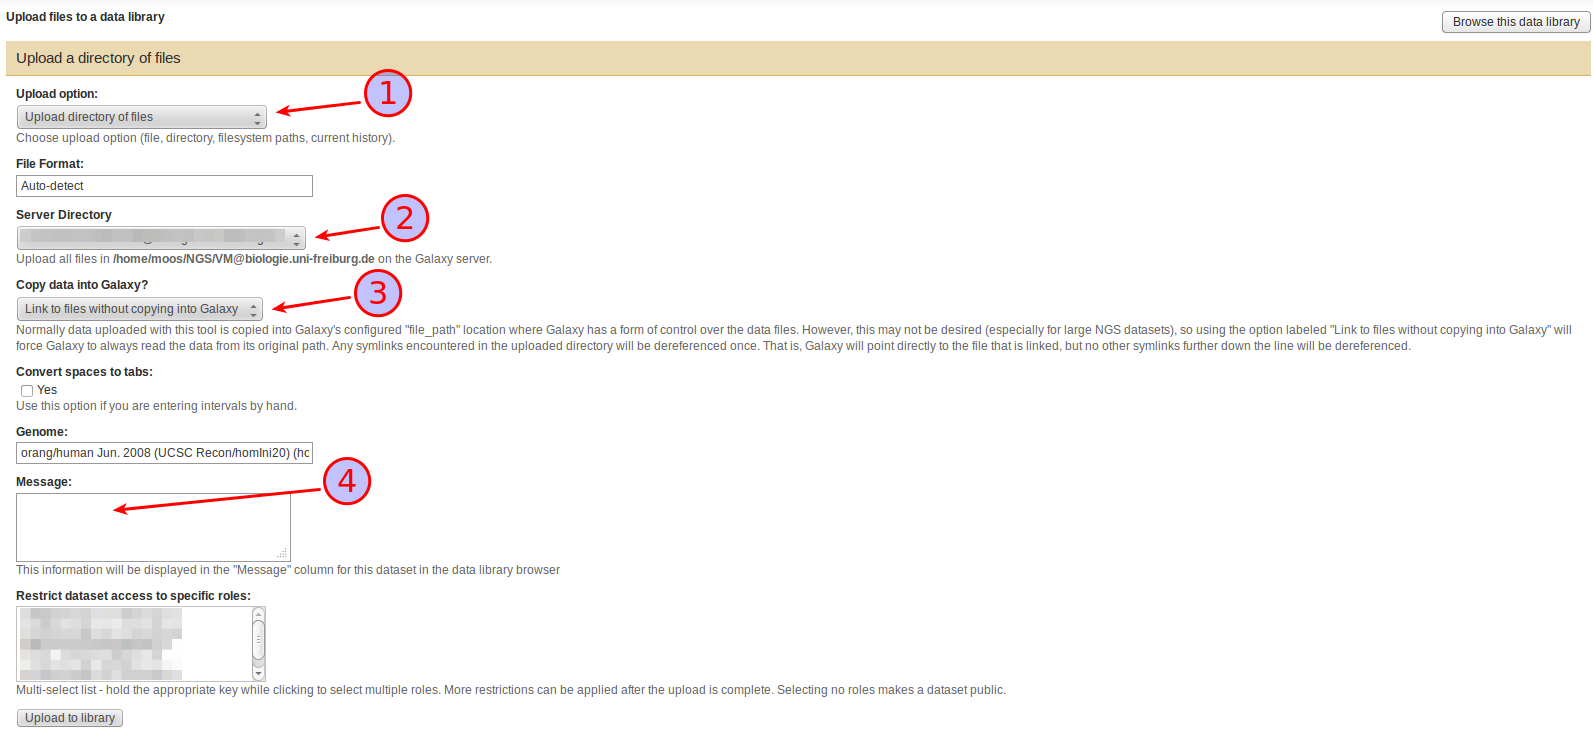
In the Upload files dialogue that appears select
Upload directory of files as Upload option (1),
a subdirectory of the Server Directory (if it contains any) to upload files from (2),
under Copy data into Galaxy, whether you want to copy the files found in the Server directory into Galaxy or whether you want to just link to them (3),
Also take the time to compose a helpful Message (4). This text will be displayed as a description of the dataset in the library and can be extremely helpful for finding a specific dataset in a growing library. If you are mixing linked and copied files in your library, this is also the place to state the nature of the current set since that information is not currently displayed anywhere else in the library.
Press Upload to library to start the upload.
Step 3: Importing library items to a history
Once the upload is finished, every user with access rights (i.e., all users in this case) will be able to import the file into their current history without copying it again:
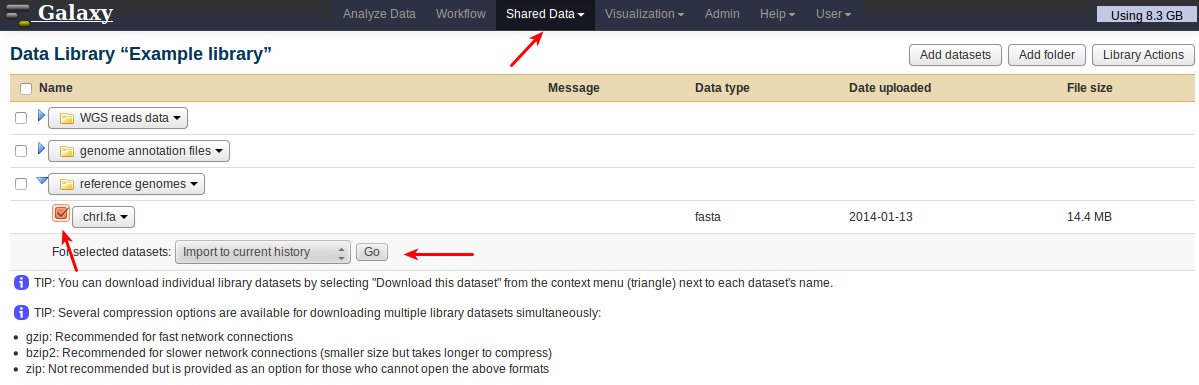
Locate the dataset by going to Shared Data, then selecting library and folder. Select the dataset by ticking its checkbox, choose the action to perform, and press Go.
Working with a linked library
It is always convenient to have a shared data library organized in folders, e.g. you may want separate folders for sequenced reads files, reference genomes and genome annotation files and you may want to use folders to group your sequenced reads files by experiment. Folders may also have more restricted permission settings than the library, so you could have some publicly accessible folders, while others may be accessible only to certain users.
Folders in a data library can be created conveniently by selecting Add folder in the Data library view. Subfolders can be created from the dropdown menu associated with every existing folder. The same menu allows the upload of data to specific folders, but datasets can also be move around between folders by selecting Move this dataset from their own dropdown menu.
In the case of a linked library, i.e. a library, in which at least some datasets got imported by linking to files without copying them into Galaxy (see above), it can, in addition, be very advantageous if the data library folder structure reflects that of the underlying server directory, so that it is easy to fix broken links.
As stated above though, uploading from nested subdirectories is not supported by Galaxy, so how can you even import data from a well-organized directory structure ?
One extremely helpful feature of Galaxy here is that during the upload step it will follow symbolic links and, in the case of linking to files instead of copying them, will store in the library the location of the target file (not that of the symbolic link).
This behavior enables the upload of files from any level of nesting simply by placing symbolic links to these files in a special first-level upload directory, which you declare as the server directory in the universe_wsgi.ini configuration file. After data has been imported, it is safe to remove the symbolic links from the upload directory.
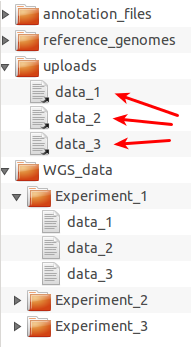
Example directory structure for organizing files for upload to Galaxy.
WGS_data folder and grouped into
experiment-specific subdirectories. The server directory, in this
example, should be set to the uploads folder in universe_wsgi.ini
(library_import_dir = some_path/uploads). Then any selection of data
files can be uploaded to Galaxy by putting symbolic links (arrows) to
these files into the uploads folder as shown here for the files from
Experiment_1. After the import, the symbolic links can be deleted to
prepare uploads for a new data import cycle.One advantage of sticking to a standardized folder structure in the data library and on disk is that it allows the administrator to rotate files easily:
assuming all files are backed up on some external storage device (as they always should be !), old files that are rarely used anymore can be removed from the file system to free disk space, but will remain visible as datasets in the data library (and possibly in old histories of users who imported them at some point). If later any user actually needs access to the file again, the administrator can restore access simply by copying the file from the backup device into the file system location corresponding to the location of the dataset in the library.
Use gzipped fastq files in Galaxy
By default, gzip compressed files are imported into Galaxy as decompressed copies. So even though MiModD can deal with gzipped fastq input, exploiting this feature from within Galaxy requires a workaround.
Currently, the only way to prevent gzip decompression during data import into Galaxy is to link to the compressed files instead of copying them into Galaxy. Step-by-step instructions on how to obtain linked datasets can be found in the Import large files into Galaxy section.
However, while the use of linked datasets prevents Galaxy from decompressing the data, it will still frown upon the data and strip off the .gz file name extension from the resulting dataset name. Galaxy will set the format of a linked gzipped fastq dataset to data instead of fastq, but to avoid later confusion due to the dataset name it is a good idea to add the .gz extension back by selecting Edit Information from the dropdown menu associated with the dataset name right after the import.
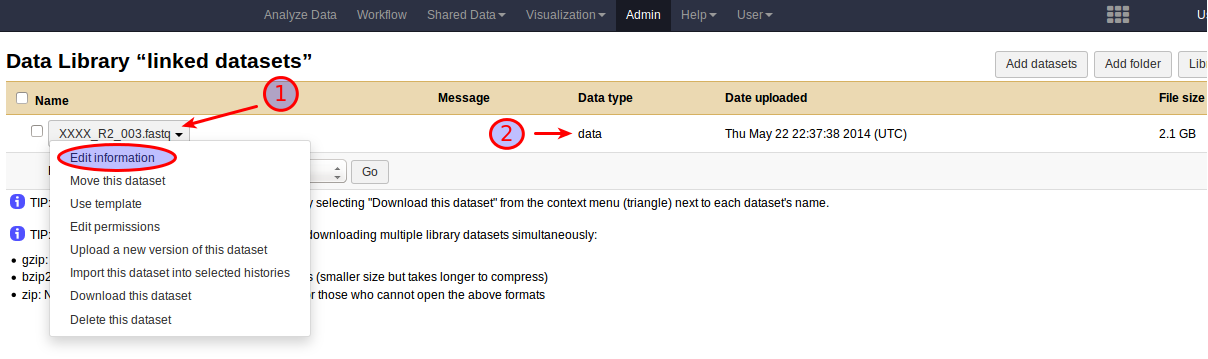
The result of adding a .fastq.gz file to Galaxy as a linked dataset.